How do you wire tiny house electrical? In this post, you will everything from tiny house electrical basics to wiring your home step-by-step.
Get our FREE tiny house materials list to help estimate costs of your tiny home.
By entering your email address you agree to receive emails from Riding Tiny. We’ll respect your privacy and you can unsubscribe at any time.
Tiny House Framing and Sheathing – The Complete Guide
- By Sang Kim
- Updated:
Once you level your trailer and build your tiny house foundation, we are now ready to move on to tiny house framing and sheathing.
From my experience, framing your tiny home is by far the most exciting part of building your tiny home. Your walls typically get framed, raised, and fastened all within the same day!
Once all four walls are up and sheathed, you will not only able to visualize your home but feel very accomplished!
Table of Contents
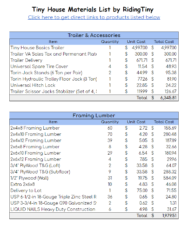
Materials and Tools You Need
- 2x4x8 Framing Lumber
- 2x4x10 Framing Lumber
- 2x4x12 Framing Lumber
- 2x6x8 Framing Lumber
- 2x6x10 Framing Lumber
- 2x6x12 Framing Lumber
- 3/4″ PlyWood T&G (Loft)
- 3/4″ PlyWood T&G (Subfloor)
- 1/2″ Plywood (Wall)
- Rafter Ties – 6-1/2-in 18-Gauge
- Rafter Tie – 3-3/4-in 18-Gauge
- Heavy Duty Construction Adhesive
- Framing Nails – 3.25in
- Exterior Screws 2.5in – 5lb
- Exterior Screws 2in – 5lb
- Exterior Joist Hanger Nails (5-lbs)
- Tension Ties
- 3/8 in. x 8 in. Zinc Plated Hex Bolt
- 3/8 in. Zinc-Plated Flat Washer (25-Pack)
- 3/8 in. 16 TPI Zinc-Plated Hex Nut (25-Pack)
- Drill, Impact Driver, Flashlight, Jigsaw – Kobalt 24v
- Framing Nail Gun – 3.25″
- Convertible Ladder- 22′
- Miter Saw
- Mitre Saw Stand Universal
- Air Compressor – 6 Gallon
- Circular Saw
- Jig Saw
- Extension Cord – 100ft 14AWG
- Safety Glasses
- Construction Gloves
- Extension Drill Bit – 12″
- Utility Knife
- Level – 4ft
- Torpedo Level – 9″
- Speed Square
Tiny House Framing Basics
Framing a house can feel daunting for beginners. But after learning a few framing techniques and basics, you will realize framing a tiny home is simple and straightforward.
However, framing your house correctly requires understanding of basic framing techniques. We will cover everything you need to know to master tiny house framing so you can put a roof over your head!
Structural Loads
Structural loads are forces that are applied to the structural components of a house. These forces are usually in the form of gravity or outside forces such as wind, snow, and earthquakes.
While being towed on the road, tiny house experiences downward forces due to its own weight and sideway & upward forces caused by oncoming wind and vibrations,.
If the load is not properly distributed, it will cause deformations and displacements in a structure that eventually collapses in extreme circumstances.
To allow for proper distribution of structural loads, you must remember to do the following:
- Use as many straight pieces of lumber as possible
- Make sure all framing groups are square and plumb.
2x4 Tiny House Framing
2×4 framing (pronounced two by four) refers to framing a home using 2×4 lumber of varying length.
A 2×4 lumber (nominal measurement), unlike the numbers suggest, measures at 1-1/2 inches by 3-1/2 inches (actual measurements). Similarly, a 2×6 (nominal) lumber will measure at 1-1/2 inches by 5-1/2 inches (actual).
New homes built in the U.S. typically use 2×4 or 2×6 framing depending on the code requirement and choice of the builder.
However, most tiny home builders will choose 2×4 framing because it cheap, readily available, and can increase overall floor space while reducing overall weight of your tiny.
Studs and Joists
When lumber is stood vertically and becomes a part of a wall, it is called a stud. A series of studs then becomes the load-bearing structures of a wall.
Likewise, if the lumber is stood parallel to the ground, it is then called a joist. A series of joists then becomes the load-bearing structures such as a subfloor, lofts, and a roof.
Recommended: What are Wall Studs and Joists?
Stud and Joist Spacing: 16 O.C. vs 24 O.C.
When framing your tiny home, you can space out your studs and joists either 16 inches on center (16 O.C.) or 24 inches on center (24 O.C).
This simply means studs and joists are separated by either 16 inches or 24 inches from each other’s center. Now, tiny houses can be built using 16 O.C. or 24 O.C framing since it is structurally stronger than 24 O.C.
However, others are choosing 24 O.C. to increase thermal efficiency and reduce material waste. Either one has its own benefits and drawbacks, but you won’t go wrong with choosing either.
For my tiny house, I chose 16 O.C. 2×4 framing.
Nail vs Screws
Nails and screws are predominantly used to frame a home. Nails are used to withstand lateral forces or forces that are being applied from side to side. Therefore, nails have better shear strength than screws.
On the other hand, screws have threads that when dug into the wood are very hard to pull apart. Therefore, screws are used to hold or grip structures together rather than nails.
Here is an excellent video explaining the differences between screws and nails. I found this video very helpful when deciding which part of framing should be done with nails vs screws.
When building your tiny home, you will be using a combination of screws and nails. For structural framing, you will use nails. On the other hand, for sheathing, you will use screws.
21 Degree Exterior Galvanized Framing Nails
3-1/2" nails are just long enough to penetrate three 2x4 studs. These framing nails + a nail gun = match made in heaven.
If you click this link and make a purchase, we earn a commission at no additional cost to you.

Tiny House Framing
With framing basics under our belt, let’s start building our tiny house walls. Here’s what you need to understand when you staring framing your walls.
Wall Framing
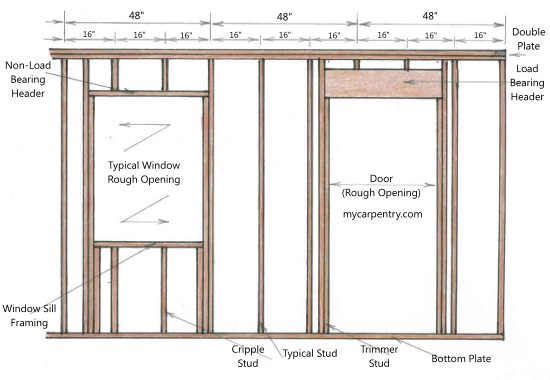
Take a look at the wall section above. A wall is made of a series of studs, a single bottom plate, a double top plate.
A typical wall can have multiple windows and doors. But, whenever you include a window or a door in your wall design, you have to break a series of studs to create an opening.
These openings allow the structural loads to be redirected around the opening, preventing doors and windows from breaking apart under the loads.
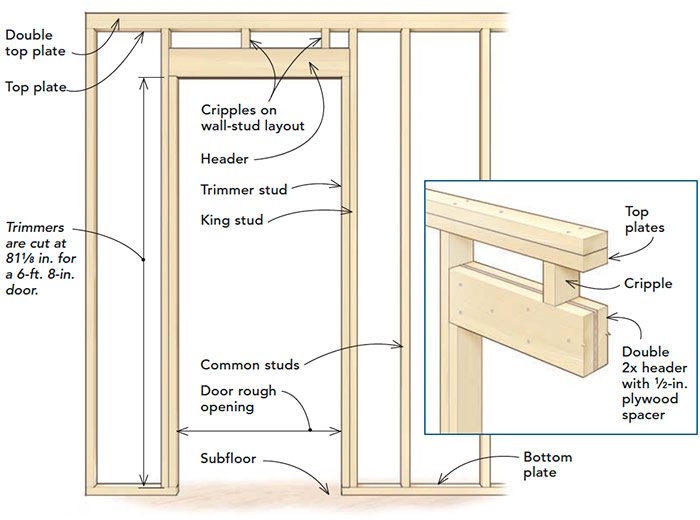
A header is a structural beam created using 1/2″ plywood and two 2x lumber (2×4, 2×6, 2×8, etc.) that spans the opening. By using a header, structural loads are rerouted to studs on both sides of the header (king studs) and studs directly supporting the header (trimmer/jack studs).
Note: Check out the span table for headers below to make sure you are using the correct header size for your windows and doors. In most circumstances, 2×6 headers should be sufficient for most windows, doors, and fenders for tiny homes.
Raising Up The Walls

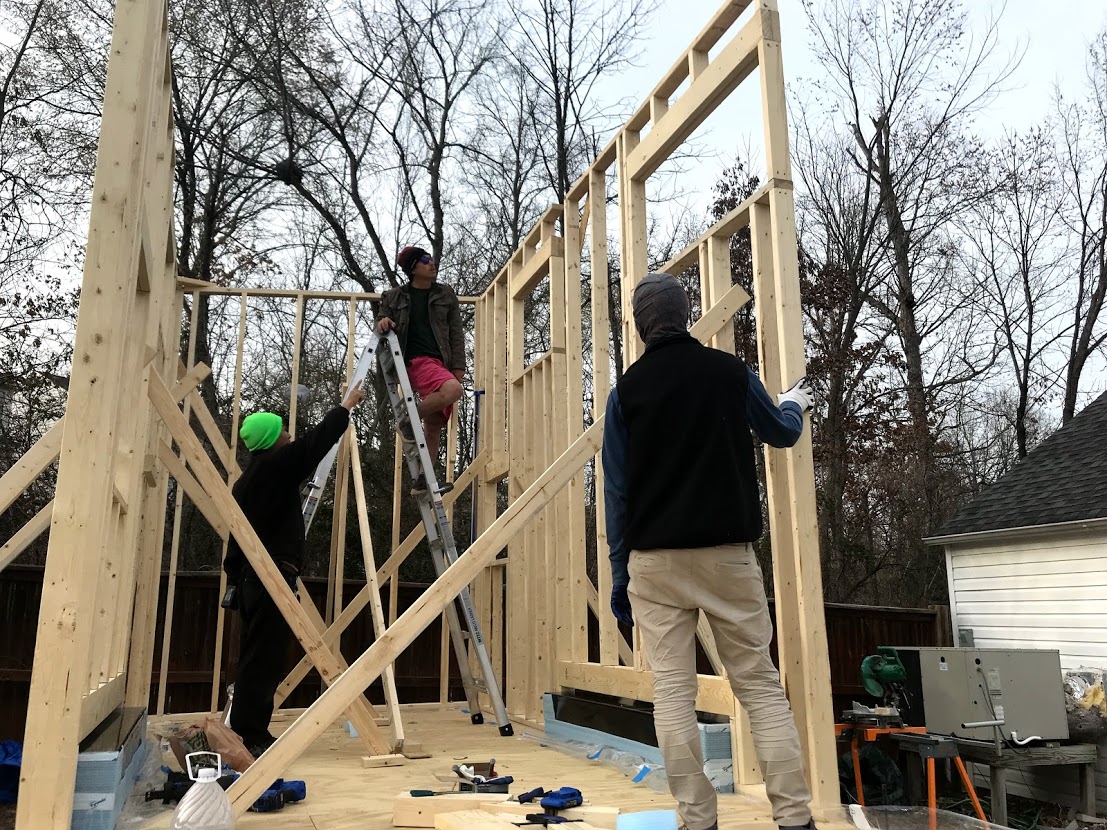
Working on your wall one section at a time, dry fit each section on the trailer deck. Using a nail gun, drive two 3-1/2″ framing nails where ever two pieces of wood meet.
Square the wall, then attach a 2×4 lumber diagonally across the wall section. This holds the shape of the finished wall section and keeps it square.
If have pre-welded bolts that come with the trailer, drill corresponding holes on the bottom plate so the wall sections can fit through the bolts.
If you don’t have pre-welded bolts, you must drill through the trailer using an extension drill bit, then use a combination of washers, nuts, and bolts to fasten the wall to the trailer. Use a set of wrenches to fasten the nuts onto the bolts.
Note: Unless you have 2-3 people help you raise the wall, you will have to break the longer sections of your wall into multiple sections.
After assembling each section, raise the wall one at a time. Once raised, check for level and proceed to attach a 2×4 stud at an angle to prevent the wall from falling. We did this on both inside and outside, for extra safety.
Working counterclockwise (or clockwise), raise the next wall section, check for plumb, and attach the stud to hold the wall upright. Wherever two wall section meets, use 3-1/2″ framing screws to hold them together.
Securing the Walls
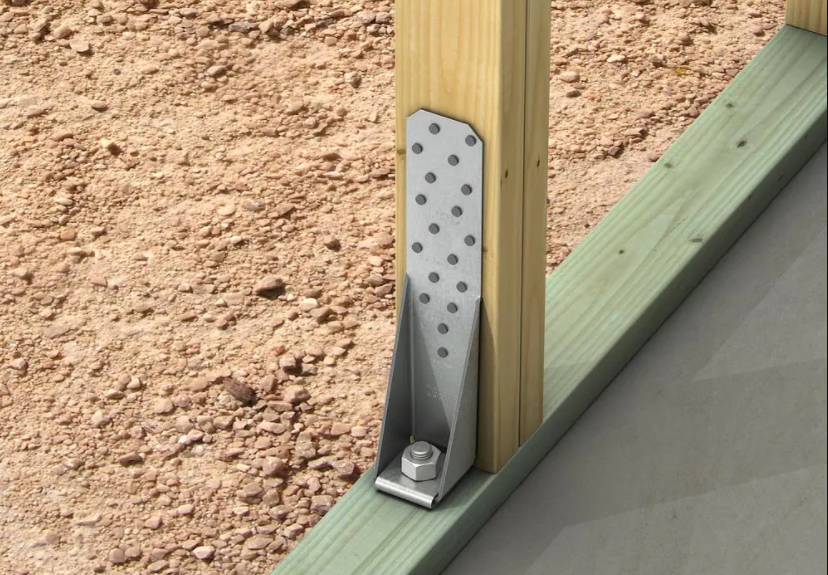
Once all walls are up, use Simpson Strong tension ties to secure the walls to the trailer deck. You will need washers, nuts, roofing nails, and tension ties to bring everything together.
Finally, install a second top plate to secure separate wall sections together. Make sure the second top plate overlaps wherever two walls join.
Fenders Framing
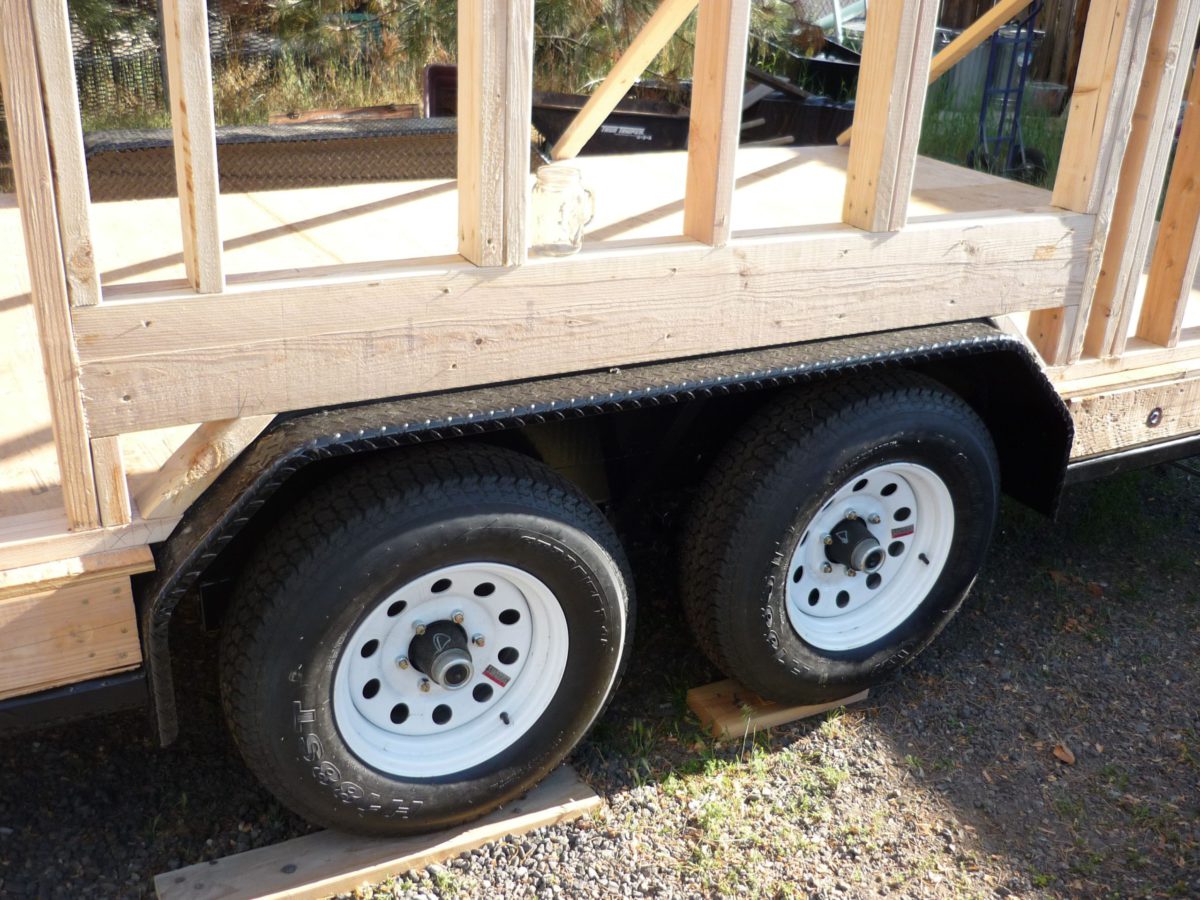
What makes tiny home framing a little different than framing a standard home is that you have to frame around the wheels.
This is not an issue. Simply treat where the wheels are located as an opening, place a 2×6 or 2×8 header along with a trimmer and jack studs.
Leave 1/2″ gap to 1″ to prevent metal fenders from touching the header. You will later flash and weatherproof the gap during the weatherproofing stage of your build.
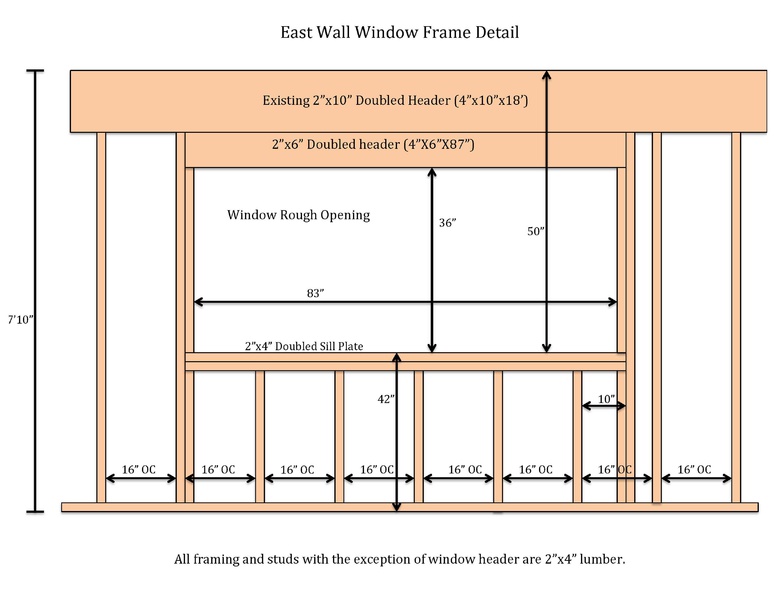
Window Framing
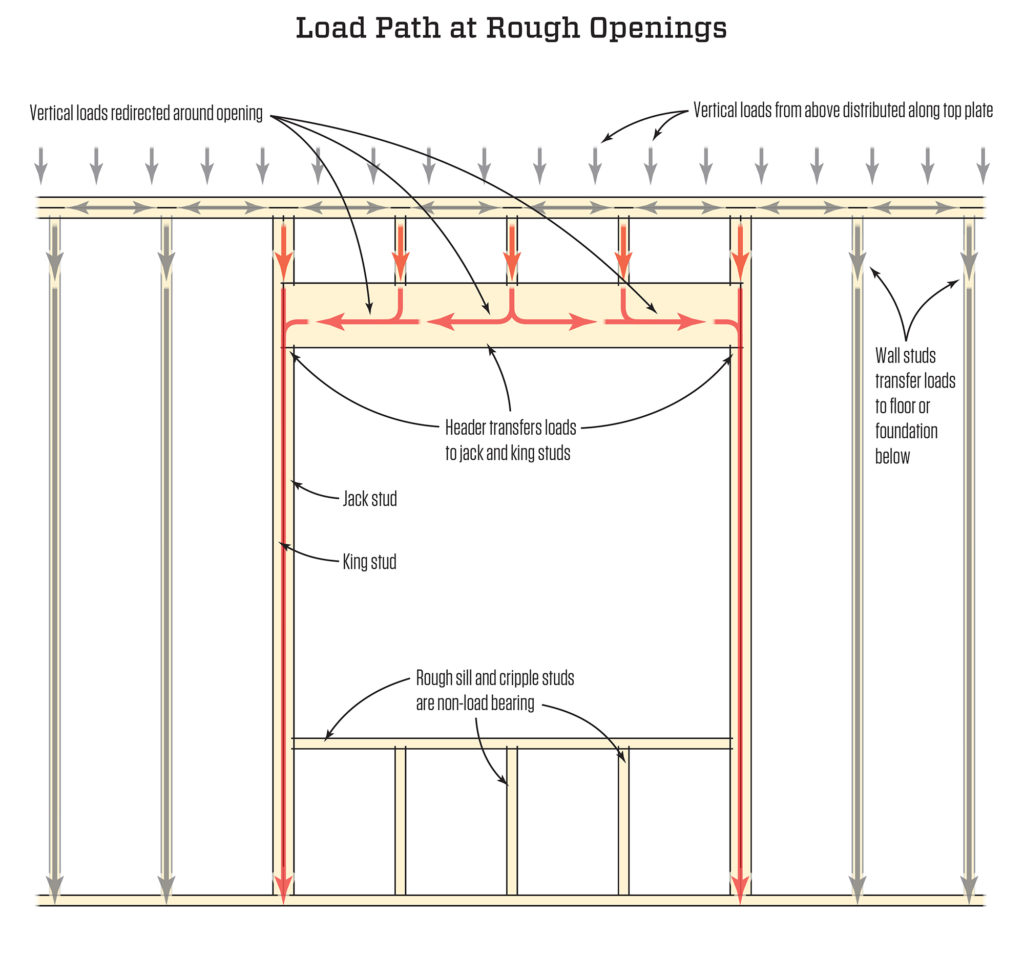
Once again, take a look at different parts that make up window framing in a wall and the load distribution around the opening.
As you can see from the image above, a rough sill, two jack studs, and a header create a rough opening. Notice that vertical loads are safely redirected around from the opening.
The rough opening must be larger than the actual size of the window by 1/2″ in width and height. This allows for proper window installation which will be covered later. For instance, a rough opening of 24″ x 48″ will fit a window of 23.5″ x 47.5″.
Door Framing
When framing a door, a rough opening is created by two trimmer studs (jack studs), a header, and the subfloor.
Similar to a rough opening of a window, a rough opening for a door should be slightly larger than the actual size of the door. However, depending on the manufacturer, the rough opening size of a door will vary.
Note: Always follow the rough opening size specified by the manufacturer. Each manufacturer might have a slightly different size specifications. You can find this information on the product description or installation guide.

Here is a video showing you how to frame a wall including a door opening, window opening, and how to create a header.
Loft Framing
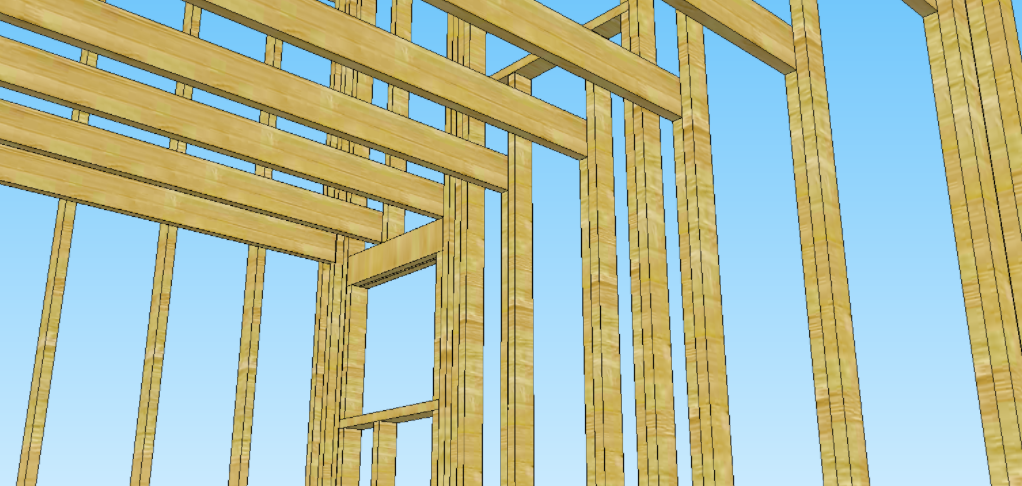
Tiny homes are confined by the size of the trailers they are built on. One way to increase space is to create lofts. Lofts are used to store your belongings and/or used as a bedroom.
Framing your loft during the framing stage of building your house serves two purposes. First, it provides a flat surface for you to step on during the roof framing. Second, by framing the loft, you can pull or push the opposing walls apart to help plumb the opposite walls.
To frame a loft, simply cut 2×4 studs to the desired loft height. Then, fasten the 2×4 studs to existing studs. Finally, cut 2×6 joists to length and fasten them to the top of the supporting stud.
I chose this loft design because of its simplicity and requiring no additional hardware and joist hangers.
Roof Framing
For my roof framing, I went with the simplest design possible. I chose the shed roof style because it was easy to understand and frame.
The shed roof has a single pitch. Roof pitch is the slope of your roof. Higher the roof pitch, more sloped the roof. For my tiny house, I went with 1:12 roof pitch to maximize headspace for my bedroom loft.
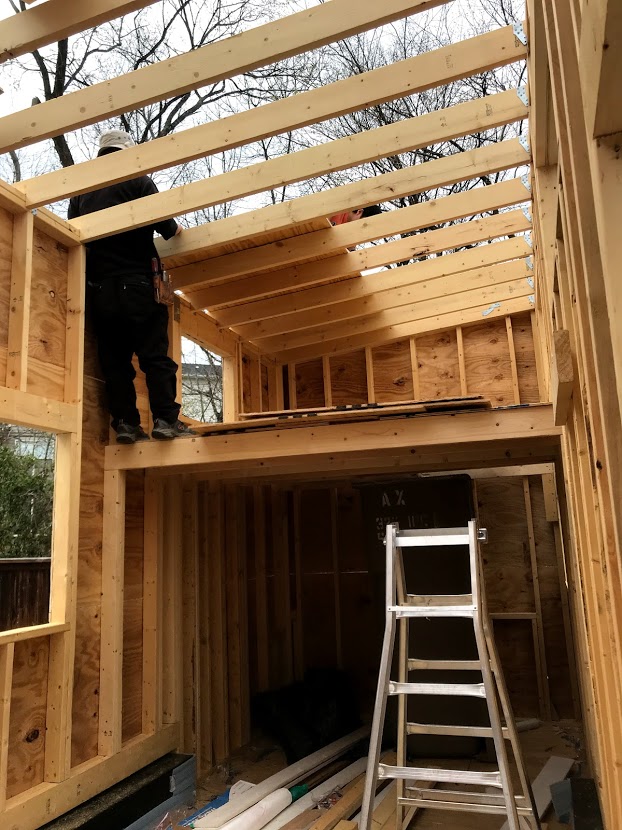
To frame a shed roof, you need to create 2×6 rafters that will sit on top of your double top plate to support your roof. Here are the steps you must follow:
- To do so, you need to cut the two ends of your rafter at the desired pitch (angles) using a miter saw. You can find a table of roof pitches and corresponding angles here. In our case, we cut both ends of our rafter at 4.76 degrees.
- Then, make two 90 degrees birdsmouth’s cut where the top plate and the rafter will meet. Use a jigsaw to cut out your bird’s mouth.
- After cutting one roof rafter including two birdsmouth cuts. You can use that rafter as a guide to cut other rafters.
- After preparing all my rafters, I used Simpson’s Ties hurricane ties and galvanized joist nails to hold down and secure the ends of each rafter to the top plate. Make sure each rafter is separated 16″ O.C.
Note: If this doesn’t make sense to you at all, you can always follow the measurements of your roof rafters and make you birdsmouth cuts according to you SketchUp file.
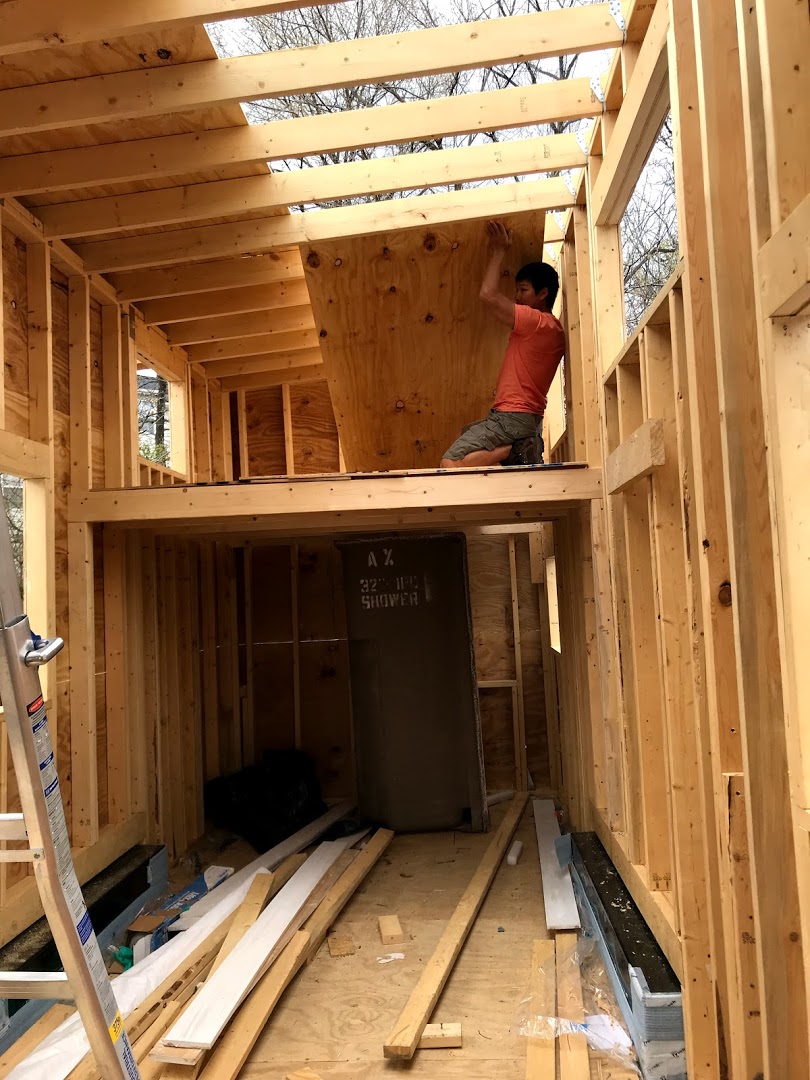
Tiny House Sheathing
Once the wall, roof, and loft framing are completed, you can move onto sheathing your walls and your roof.
The purpose of sheathing is to provide strength to your walls and roof, provide a base for siding and roofing, and provide another layer of protection against outside elements. Most importantly, it ties together all of your framing members into one rigid structure thereby providing incredible racking strength.
Wall Sheathing
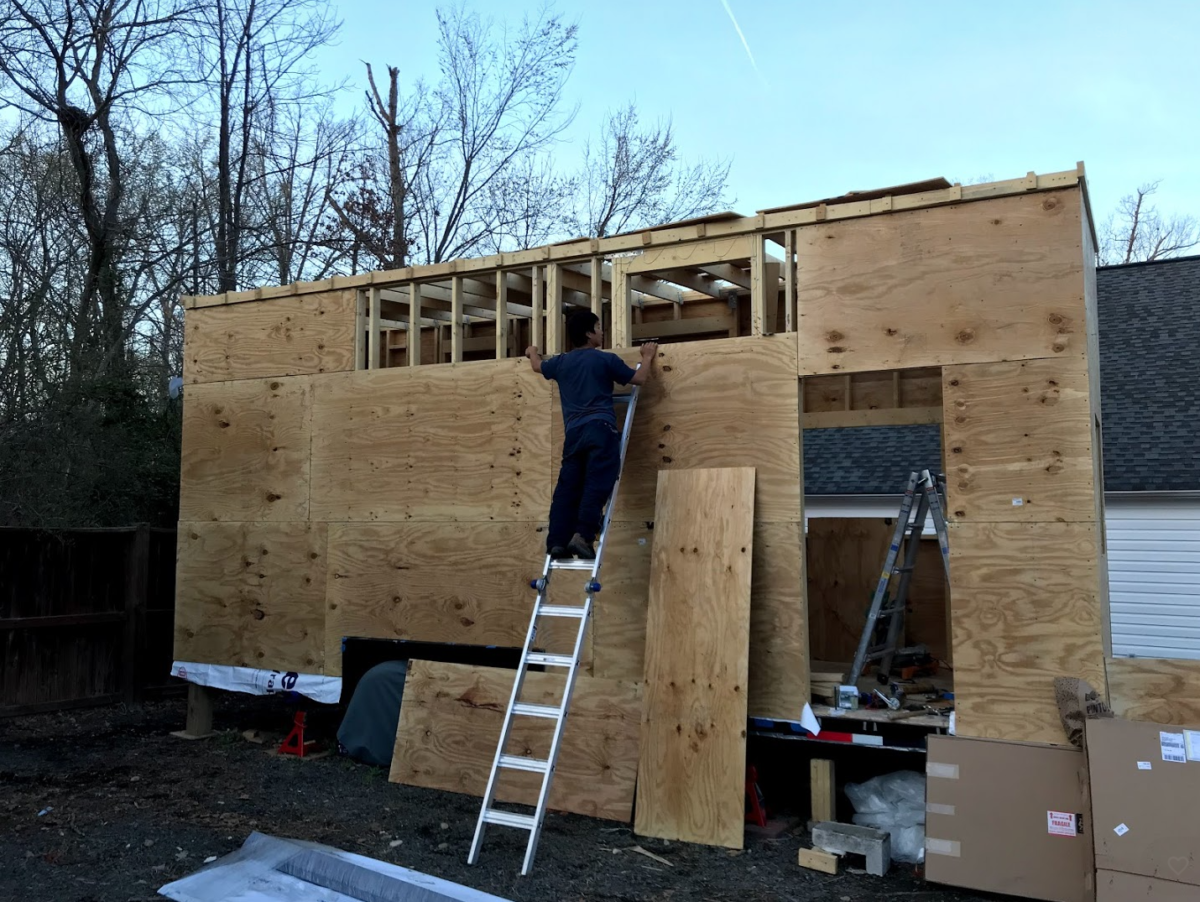
For wall sheathing, you use 1/2″ plywood and 2″ screws. Firstly, cut the plywood to the desired size. Then, work your way from bottom row to the top row, installing one sheet at a time.
Don’t forget to leave 1/8″ gap between panel ends. You can use screws or gap spacers to get this job done.
Apply construction adhesive to the studs, subfloor, and any area where sheathing will make contact with the wall. Attach the sheets to the wall using 2-1/2″ exterior screws.
When fastening the sheathing to the wall, the screws should be placed 6″ apart at the panel’s edge and 12″ apart along with the intermediate studs.
Sheathing around windows and doors
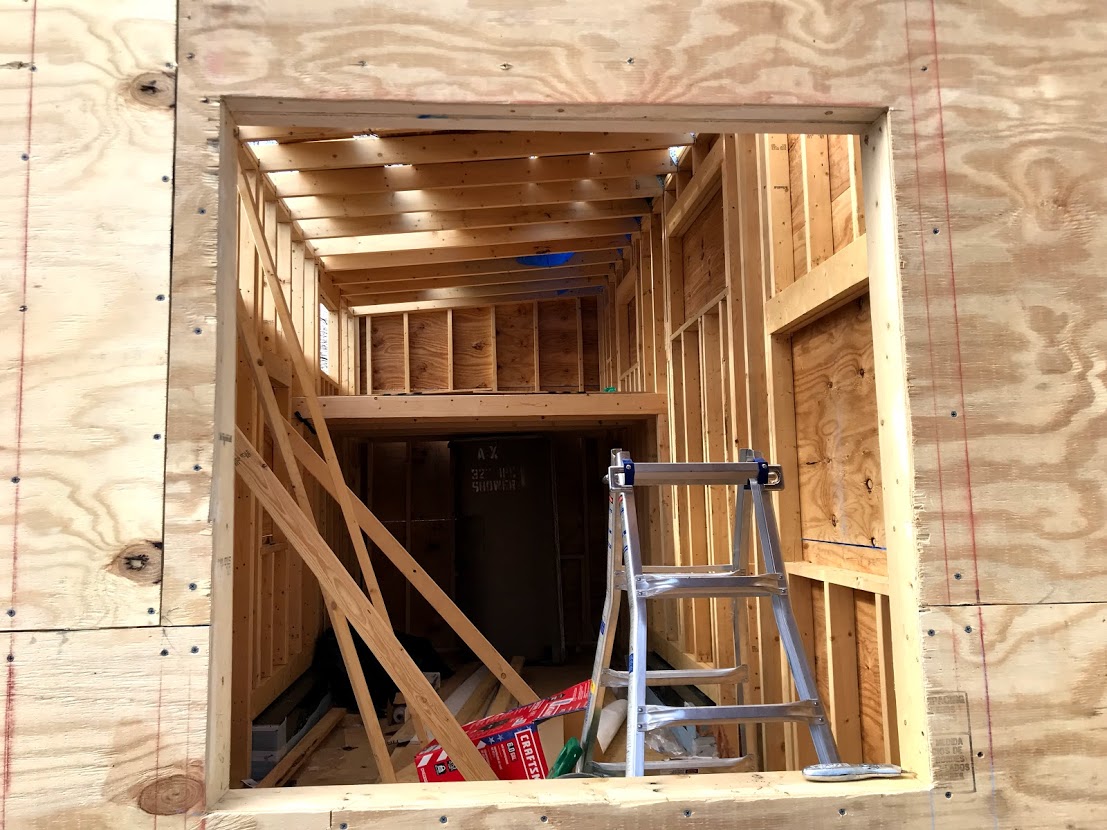
Where windows and doors are located, you can simply sheathe over it and later use a circular saw or jigsaw to cut up the opening.
To cut the opening, you simply poke small holes using a drill bit at at four corners of the opening. Using a chalk saw, chalk the four edges of the opening using the dilled holes as the two ends. Using the lines as guides, use chalk saw or jigsaw to cut the opening.
Roof Sheathing
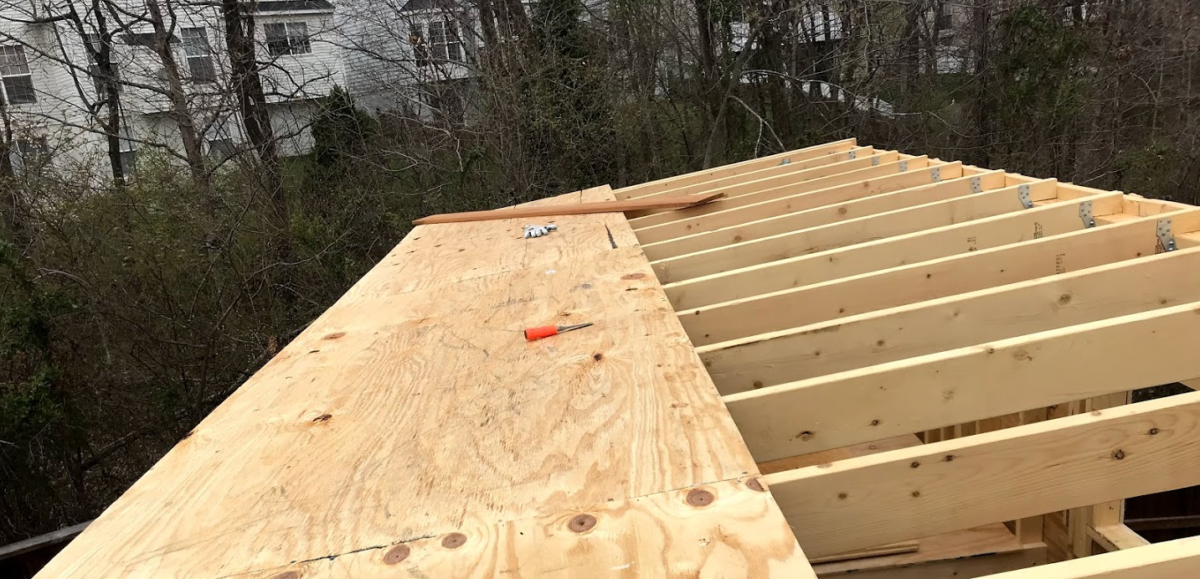
For roof sheathing, I used 4×8 1/2″ plywood. Now, if you plan to live in a snowy region, you may consider opting for thicker 3/4″ plywood or OSB to prevent roof sagging.
Cut panels to desired length specified in your SketchUp file.
Don’t forget to apply construction adhesive to the rafters before installing the sheets horizontally across the rafters. Leave 1/8″ gap where two plywood meet at the rafter. Subsequently, fasten the sheathing to the rafters using 2″ exterior screws.
Frequently Asked Questions
Tiny house walls should be framed with 2×4 framing at bare minimum. Meaning tiny house walls are 3.5″ thick or thicker. This ensures structural rigidity while providing ample space for insulation.
Framing and sheathing a tiny home will cost anywhere from $1,200 to $2,900 depending on the size of the tiny home. For our 24′ tiny home, framing and sheathing cost us $1900 in 2019.
They both serve the same purpose of providing racking strength to walls. Simply buy the cheaper of the two.
No walls are perfectly square and plumb. The goal is to square and plumb as much as possible. As a general rule of thumb, try squaring the wall first and attach a 2×4 to hold the wall in shape. Then, raise the wall and plumb the wall as you fasten it to the trailer subfloor.
Get our FREE tiny house materials list to help estimate costs of your tiny home.
By entering your email address you agree to receive emails from Riding Tiny. We’ll respect your privacy and you can unsubscribe at any time.

Sang Kim is the founder of Riding Tiny® and has been active in the tiny house scene since 2018. Since then, his mission is to help people plan and build their dream tiny homes. And each year, he continues to help more people on the path to simple living and financial independence. Follow Sang's journey @ridingtiny
Sang Kim is the founder of Riding Tiny® and has been active in the tiny house scene since 2018. Since then, his mission is to help people plan and build their dream tiny homes. And each year, he continues to help more people on the path to simple living and financial independence. Follow Sang's journey @ridingtiny
Recommended Reading
The tiny house movement is here to stay. Learn everything you need to know about living in a smaller home.
There are many options to choose from when it comes to tiny house roof. But there is a clear winner. Learn all about it in this post!
Learn how to build a tiny house on wheels from scratch, step-by-step! Here, are all the resources you need to build yourself a tiny house.
How do you wire tiny house electrical? In this post, you will everything from tiny house electrical basics to wiring your home step-by-step.
If you’re wondering how to estimate tiny house costs, wonder no more! It’s not as difficult as you may think!